I've made a software for those who wish to create poster style files out of DVD/BluRay(also web or any image basically) covers for their media manager like kodi, jellyfin/emby, plex, etc.
What it does is load a base folder and scan it as well as every subfolder to detect cover files and either allow you to tune the crop or crops it automatically depending on the settings you choose.
All you need is to have ImageMagick installed(only the convert executable is necessary) and point to it in my app(download located in the "Downloads" section at the bottom of this post).
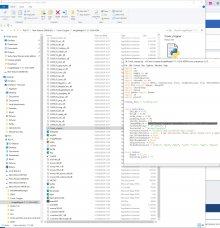
This is what you see when you launch it:

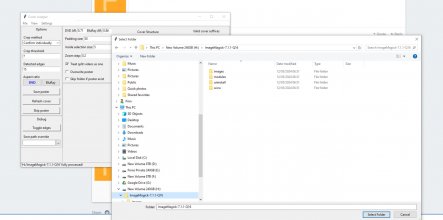
There are detailed explanations of all the settings in spoiler tags below, but if you're not interested in playing with those, all you really need is to set the ImageMagick path in the settings panel, click "File"->"Select root path" modify the crop zone if desired and press the "Save poster" button.
With a cover loaded:

To adjust the cropping, simply move the gray lines, which splits the cover so as to not hide any part of it, to select what the poster file will include.
The aspect ratio is maintained when resizing to make all of the poster be the same size There's a different aspect ration for DVD and BluRay covers so you'd have different heights if you have a mix of both, unless you change the default aspect ratio for one in the settings so that both are the same.
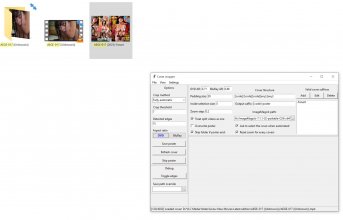
Cover selection with preview and dimensions if multiple are detected:

You may also want to change the "Cover structure", "Output suffix" and "Valid cover suffixes" in the settings panel to match your collection and how you want the file to be saved.
-If a gray line is not visible on one of the sides, it means that the poster selection for that side goes up to the edge.
-You can click next to the edge and drag it in to bring back the gray line and reduce the poster selection.
-You can resize any edge by clicking on any part of the gray lines or slightly inside of the selection and dragging them.
-The side selection priority on the corners start from the left and goes clockwise, 2 sides can't be moved at once.
-You can also move the whole selection without resizing it by clicking inside of the selection away from the gray lines.
- The text boxes that contain text are only saved internally once you click out of them.
- The checkboxes, buttons and menu items all apply whatever they do immediately internally.
- Although all settings are applied internally as described above, they will not be saved once you close the software unless you save them with the settings menu options.
This is intended behavior in case you wish to keep a specific configuration but want to experiment with changing the settings and not having to change everything back one by one or reset everything.
- To reset the settings to default, you need to delete the "config.ini" file located in the same folder as the software.
- There is one hidden setting, VideoExtensions, that can only be changed once the settings panel content is saved to the "config.ini" file and you open it.
It contains all of the extensions that are detected as video files so it can be modified by following the same pattern it contains, but it should not be necessary.
- The last selected root path is also saved in the "Options" section but isn't really used. It is loaded but it will not start the scanning process to detect the covers.
- All of the settings from "config.ini" are loaded when and only when the software is launched.
Remember that all settings are applied pretty much immediately so if you change a setting that applies to something that is currently busy doing its thing, it will apply to whatever it still need to do and it can potentially crash if it is actively doing something. It is safe if it's waiting for something, like waiting for you to save the poster to move on to the next if it's something that applies to cover processing, which is everything in the options and debug panel and most things in the settings.
It will also select the first cover with the "Crop method" set to "Fully automatic".

The list contains the name of the cover file, " - " as a separator and then the dimensions of the image.
You can see a preview of the cover below the list if you hover your mouse cursor over the list items.
To select which image will be used to crop the poster, you need to click on the list item, which will close the cover selection window and load it in the main UI.

The default, 0.2, means when you zoom in, it will go from 1x to 1.2x and so on. It will take 5 zoom in to double(2x or 200%) the cover size.
What is considered a similar enough file name is a difference of only 1 character with the possible addition of a "-", "." or "_" character before it for up to 2 characters removed from the poster file.
For example, if we have the files "DANDY-907a_4K.mp4", "DANDY-907b_4K.mp4" and "DANDY-907c_4K.mp4", with this option on, it will save one poster as "DANDY-907_4K-poster.jpg" with the default output settings instead of making 3 poster files.
If left unchecked, which is the default, it will simply skip to the next folder without doing anything if a file of the same name exist.
Useful if you aborted before the end of processing an want to load the same path without having to redo everything.
This is the default "[code]/[any][suffix][any].[any]" and it consist of 5 separate parts between [](the rest outside of [] is only a visual help) which I'll explain below:
The possible values(all in lowercase) are "code", "movie", "suffix", "any" and "none" but not all of them can be used everywhere.
[code]/[any][suffix][any].[any] : This is the current folder name.
It can be set to either [code], which will register the folder name as the code which can then be reused later, or it can be set to [any], which does nothing special.
[code]/[any][suffix][any].[any] : This is the base of the filename, which means everything that comes before the prefix.
It can be set to [code], which will either use what was set before as the code or set whatever is found there as the code for future use, [movie], which will match the filename of every video files in the folder and thing else for that portion of the cover filename and it can be set to [any] which will match anything.
[code]/[any][suffix][any].[any] : This is the suffix of the cover filename.
It can be set to either [suffix], which will match anything added to the "Valid cover suffixes" list on the right or it can be set to [none] to not match anything.
[code]/[any][suffix][any].[any] : This is whatever comes after the suffix(the suffix suffix basically).
This can be set to either [any] to match any extra characters in the filename after the suffix or it can be set to [none] to ensure that there is no characters after the suffix.
[code]/[any][suffix][any].[any] : This is the file extension.
It can be set to either [any] to match any extension or it can be set to whatever specific extension you want, for example [jpg].
Usage examples(these assume "-cover" is in the suffix list, which is the default):
If you want to match a cover named "ABC-123-cover.jpg" in a folder named "ABC-123", you can do [code]/[code][suffix][none].[jpg] if you want to be super specific(which is only good if you know all of your covers are that specific), or you can do [any]/[any][suffix][any].[any] which will only look for a file that contains "-cover" in it and find "ABC-123-cover.jpg" but also others like "ABC-123-cover_4K.jpg" or "ABC-123_low-quality-cover.DMM.png" and the folder doesn't have to be named "ABC-123".
If you want to find "ABC-123.jpg" specifically in a folder named "ABC-123", you would do [code]/[code][none][none].[jpg].
If you want to find a cover named the same as the movie filename but with various possible image extensions, you would do [any]/[movie][none][none].[any] and it would find anything that matches all of the video files in the folder and then filter out everything that isn't an image.
The default is "[movie]-poster" where what's in [] will be modified to match the 2 possible values specified and what's after is simple text that will always be the same. the [] portion of it can be removed to always use the same name no matter what and it will always be saved as a jpg so no need to specify an extension.
[code]-poster : This is the dynamic section of the poster output file name.
This can be [code] which will have the effect of using whatever the first thing in "Cover structure" above detected where [code] is also set in it but if it wasn't set in there, it will simply be ignored.
It can also be set to [movie] which will use every video filename in the folder to save the poster file, which means it's going to make a copy of the poster if multiple videos are detected, with the exception of videos split in parts if the option "Treat split videos as one" is set.
[code]-poster : This is the static section of the poster output file name.
The text specified here will simply be added to the output file name as-is, before the extension.
If the "Crop method" decides to display the cover(not possible with Fully automatic), the cover selection window will open regardless if the setting is checked or not.
If not checked, the zoom will remain as-is regardless of if it was set automatically(to meet the minimum cover size for the UI) or manually.
Note: The zoom can also be reset manually from the View menu or by holding down Ctrl and pressing z.
- Pressing the "Add" button will open a dialog window that allows you to enter text and once you press ok on that, the text will be added to the list below.
- Selecting an item in the list by clicking it and then pressing the "Edit" button will open a dialog window that allows you to edit the selected text and pressing ok sill change that text in the list below.
- Selecting an item in the list by clicking it and then pressing the "Delete" button will remove the selected text from the list below.

- "Confirm individually" will display every covers with the poster selection for manual verification and will load the next once it is saved or skipped.
- "Confirm on threshold" will display the cover only if it would crop more than the "Crop threshold" amount, otherwise it will crop it automatically an move on to the next.
- "Fully automatic" will crop every covers without any user interaction until it reaches the end.
Increasing this number will increase the chances of the correct poster width being detected but it can also decrease its accuracy by a few pixels if it's too high, which can vary wildly from cover to cover.
The default, 15, was the best middle ground I found with the limited testing I already did but it can probably benefit from being increased most of the time.
3 is the minimum value I would recommend(1 will more often than not detect the left edge of the spine since it goes from left to right) and above 100 is very likely to not be accurate most of the time.
This can also be manually selected to apply the opposite aspect ratio than the one currently selected which will be reflected on the gray lines used for the poster selection.
If no cover is loaded, this does nothing.
It can also be triggered with the Ctrl+s(Hold Ctrl and then press s) keyboard shortcut.
It can also be triggered with the Ctrl+r(Hold Ctrl and then press r) keyboard shortcut.
It can also be triggered with the Ctrl+k(Hold Ctrl and then press k) keyboard shortcut.

The pink lines are purely visual and will not be saved on the poster file if left on.
Cover with internally detected edges toggled on and all the panels hidden.


It automatically begins to search once selected so make sure to set all other options and settings first.
It can also be triggered with the Ctrl+p(Hold Ctrl and then press p) keyboard shortcut.

The zoom is applied even if no cover is loaded but nothing will change until a cover is loaded.
It can also be triggered with the Ctrl++(Hold Ctrl and then press +, which might require also holding shift if that is what's required to type a +) keyboard shortcut.
The zoom is applied even if no cover is loaded but nothing will change until a cover is loaded.
It can also be triggered with the Ctrl+-(Hold Ctrl and then press -) keyboard shortcut.
It can also be triggered with the Ctrl+z(Hold Ctrl and then press z) keyboard shortcut.

- The settings panel will sometimes get toggled on under the cover, but the main window can be manually resized to show it. Cause currently unknown.
Executable v1 (65MB): MediaFire v1 Mirror: Filejoker v1
Source: See the 1st attachment below
Source: See the 2nd attachment below.
Note: The linux specific source required one thing to be removed to work, which means it's important to not click back on the main window when the cover selection window is open or the software could crash. I will hopefully find a way to do this that works properly for both windows and linux in the future.
ImageMagick: https://imagemagick.org/script/download.php
Any version should do but I use the "portable-Q16-x64" one.
Any feedback and especially bug reports are very welcome, either as a reply here or in a private message if you're too shy.
What it does is load a base folder and scan it as well as every subfolder to detect cover files and either allow you to tune the crop or crops it automatically depending on the settings you choose.
All you need is to have ImageMagick installed(only the convert executable is necessary) and point to it in my app(download located in the "Downloads" section at the bottom of this post).
This is what you see when you launch it:
There are detailed explanations of all the settings in spoiler tags below, but if you're not interested in playing with those, all you really need is to set the ImageMagick path in the settings panel, click "File"->"Select root path" modify the crop zone if desired and press the "Save poster" button.
With a cover loaded:
To adjust the cropping, simply move the gray lines, which splits the cover so as to not hide any part of it, to select what the poster file will include.
The aspect ratio is maintained when resizing to make all of the poster be the same size There's a different aspect ration for DVD and BluRay covers so you'd have different heights if you have a mix of both, unless you change the default aspect ratio for one in the settings so that both are the same.
Cover selection with preview and dimensions if multiple are detected:
You may also want to change the "Cover structure", "Output suffix" and "Valid cover suffixes" in the settings panel to match your collection and how you want the file to be saved.
Poster crop selection :
-The cover will be split into 2 to 9 section by wide gray lines to create a rectangle that displays the crop selection perfectly without hiding any pixels.-If a gray line is not visible on one of the sides, it means that the poster selection for that side goes up to the edge.
-You can click next to the edge and drag it in to bring back the gray line and reduce the poster selection.
-You can resize any edge by clicking on any part of the gray lines or slightly inside of the selection and dragging them.
-The side selection priority on the corners start from the left and goes clockwise, 2 sides can't be moved at once.
-You can also move the whole selection without resizing it by clicking inside of the selection away from the gray lines.
Configuration :
- The text boxes that contain numbers are immediately saved internally as you're modifying them.- The text boxes that contain text are only saved internally once you click out of them.
- The checkboxes, buttons and menu items all apply whatever they do immediately internally.
- Although all settings are applied internally as described above, they will not be saved once you close the software unless you save them with the settings menu options.
This is intended behavior in case you wish to keep a specific configuration but want to experiment with changing the settings and not having to change everything back one by one or reset everything.
- To reset the settings to default, you need to delete the "config.ini" file located in the same folder as the software.
- There is one hidden setting, VideoExtensions, that can only be changed once the settings panel content is saved to the "config.ini" file and you open it.
It contains all of the extensions that are detected as video files so it can be modified by following the same pattern it contains, but it should not be necessary.
- The last selected root path is also saved in the "Options" section but isn't really used. It is loaded but it will not start the scanning process to detect the covers.
- All of the settings from "config.ini" are loaded when and only when the software is launched.
Processing folders :
The folder search for covers, current cover processing and the UI are all in separate threads so as soon as the first cover gets loaded, you don't have to wait for them to all be detected before you can start saving the posters or changing UI options.Remember that all settings are applied pretty much immediately so if you change a setting that applies to something that is currently busy doing its thing, it will apply to whatever it still need to do and it can potentially crash if it is actively doing something. It is safe if it's waiting for something, like waiting for you to save the poster to move on to the next if it's something that applies to cover processing, which is everything in the options and debug panel and most things in the settings.
Status Bar(at the very bottom of the window) :
Once a root path is loaded, the status bar will display between [] the current folder with a cover, a "/" and the current total of folders with covers detected in them and will follow that with the full path of the currently loaded cover.Cover selection :
If you close the cover selection window without choosing a cover, it will select the first one automatically.It will also select the first cover with the "Crop method" set to "Fully automatic".
- Skip this one :
This will immediately skip to the next folder without saving anything in the current one or displaying a cover.- Cover file list :
This is the list of all of the detected covers as decided by the "Cover structure" setting. it is located just below the skip button.The list contains the name of the cover file, " - " as a separator and then the dimensions of the image.
You can see a preview of the cover below the list if you hover your mouse cursor over the list items.
To select which image will be used to crop the poster, you need to click on the list item, which will close the cover selection window and load it in the main UI.
- Cover file preview :
All of the images from the list above are resized down to 300 pixels high(unless smaller than that in which case they keep their original dimension) with its aspect ratio preserved with the width and displayed at the bottom when the cursor is above a list item.- DVD AR :
This decides what the aspect ratio of the posters cropped from DVD covers should be. It's not recommended to modify this unless too much is getting cropped from the front of your DVD covers or you want a unique aspect ratio for both BluRay and DVD covers.- BluRay AR :
This decides what the aspect ratio of the posters cropped from BluRay covers should be. It's not recommended to modify this unless too much is getting cropped from the front of your BluRay covers or you want a unique aspect ratio for both BluRay and DVD covers.- Padding size :
This decides what the width of the gray lines used to select the poster area is.- Inside selection size :
This decides how many pixels on the inside of the gray lines can be clicked on to still allow moving the gray lines to resize the selection rather than move it. If this is set to 0, it will become impossible to bring back a gray line once it disappears on a border.- Zoom step :
This decides by how much the zoom is increased or decreased each time the zoom is modified. Increasing this will make the zoom more and decreasing it will make the zoom less.The default, 0.2, means when you zoom in, it will go from 1x to 1.2x and so on. It will take 5 zoom in to double(2x or 200%) the cover size.
- Treat split videos as one :
This will force only one poster file to be created even if multiple video files are detected if their file name is similar enough. The poster file will take their common name.What is considered a similar enough file name is a difference of only 1 character with the possible addition of a "-", "." or "_" character before it for up to 2 characters removed from the poster file.
For example, if we have the files "DANDY-907a_4K.mp4", "DANDY-907b_4K.mp4" and "DANDY-907c_4K.mp4", with this option on, it will save one poster as "DANDY-907_4K-poster.jpg" with the default output settings instead of making 3 poster files.
- Overwrite poster :
If this is checked, it will overwrite an existing file if it is named the same as the poster file.If left unchecked, which is the default, it will simply skip to the next folder without doing anything if a file of the same name exist.
- Skip folder if poster exist :
If it detects at least one poster file matching the selected naming for them in the folder, it will abort and immediately skip to the next folder without doing anything.Useful if you aborted before the end of processing an want to load the same path without having to redo everything.
- Cover structure:
This decides what will be detected as a cover file. You can simply leave it empty and it will detect every images in the folders but setting it properly won't waste time on files that aren't images and will make automation better.This is the default "[code]/[any][suffix][any].[any]" and it consist of 5 separate parts between [](the rest outside of [] is only a visual help) which I'll explain below:
The possible values(all in lowercase) are "code", "movie", "suffix", "any" and "none" but not all of them can be used everywhere.
[code]/[any][suffix][any].[any] : This is the current folder name.
It can be set to either [code], which will register the folder name as the code which can then be reused later, or it can be set to [any], which does nothing special.
[code]/[any][suffix][any].[any] : This is the base of the filename, which means everything that comes before the prefix.
It can be set to [code], which will either use what was set before as the code or set whatever is found there as the code for future use, [movie], which will match the filename of every video files in the folder and thing else for that portion of the cover filename and it can be set to [any] which will match anything.
[code]/[any][suffix][any].[any] : This is the suffix of the cover filename.
It can be set to either [suffix], which will match anything added to the "Valid cover suffixes" list on the right or it can be set to [none] to not match anything.
[code]/[any][suffix][any].[any] : This is whatever comes after the suffix(the suffix suffix basically).
This can be set to either [any] to match any extra characters in the filename after the suffix or it can be set to [none] to ensure that there is no characters after the suffix.
[code]/[any][suffix][any].[any] : This is the file extension.
It can be set to either [any] to match any extension or it can be set to whatever specific extension you want, for example [jpg].
Usage examples(these assume "-cover" is in the suffix list, which is the default):
If you want to match a cover named "ABC-123-cover.jpg" in a folder named "ABC-123", you can do [code]/[code][suffix][none].[jpg] if you want to be super specific(which is only good if you know all of your covers are that specific), or you can do [any]/[any][suffix][any].[any] which will only look for a file that contains "-cover" in it and find "ABC-123-cover.jpg" but also others like "ABC-123-cover_4K.jpg" or "ABC-123_low-quality-cover.DMM.png" and the folder doesn't have to be named "ABC-123".
If you want to find "ABC-123.jpg" specifically in a folder named "ABC-123", you would do [code]/[code][none][none].[jpg].
If you want to find a cover named the same as the movie filename but with various possible image extensions, you would do [any]/[movie][none][none].[any] and it would find anything that matches all of the video files in the folder and then filter out everything that isn't an image.
- Output suffix:
This decides what the filename will be for saving the poster file.The default is "[movie]-poster" where what's in [] will be modified to match the 2 possible values specified and what's after is simple text that will always be the same. the [] portion of it can be removed to always use the same name no matter what and it will always be saved as a jpg so no need to specify an extension.
[code]-poster : This is the dynamic section of the poster output file name.
This can be [code] which will have the effect of using whatever the first thing in "Cover structure" above detected where [code] is also set in it but if it wasn't set in there, it will simply be ignored.
It can also be set to [movie] which will use every video filename in the folder to save the poster file, which means it's going to make a copy of the poster if multiple videos are detected, with the exception of videos split in parts if the option "Treat split videos as one" is set.
[code]-poster : This is the static section of the poster output file name.
The text specified here will simply be added to the output file name as-is, before the extension.
- ImageMagick path:
This is the location where the ImageMagick convert executable is located on your computer. You can either click on the ... button to open a path selection dialog or you can enter the path manually in the text box.- Ask to select the cover when automated :
If this is checked, the cover selection window will appear if more than one potential cover is detected in the folder when a "Crop method" with automation is used.If the "Crop method" decides to display the cover(not possible with Fully automatic), the cover selection window will open regardless if the setting is checked or not.
- Reset zoom for every covers :
If this is checked, the zoom will reset to 1x if it was changed manually or automatically after every new cover is loaded.If not checked, the zoom will remain as-is regardless of if it was set automatically(to meet the minimum cover size for the UI) or manually.
Note: The zoom can also be reset manually from the View menu or by holding down Ctrl and pressing z.
- Valid cover suffixes :
This manages the list of text that a potential cover can specifically contain. every item on this list will be compared to all the files in the folder if [suffix] is specified in "Cover Structure".- Pressing the "Add" button will open a dialog window that allows you to enter text and once you press ok on that, the text will be added to the list below.
- Selecting an item in the list by clicking it and then pressing the "Edit" button will open a dialog window that allows you to edit the selected text and pressing ok sill change that text in the list below.
- Selecting an item in the list by clicking it and then pressing the "Delete" button will remove the selected text from the list below.
- Crop method :
This controls how much gets automated.- "Confirm individually" will display every covers with the poster selection for manual verification and will load the next once it is saved or skipped.
- "Confirm on threshold" will display the cover only if it would crop more than the "Crop threshold" amount, otherwise it will crop it automatically an move on to the next.
- "Fully automatic" will crop every covers without any user interaction until it reaches the end.
- Crop threshold :
This is the amount of pixels cropped from either the top and bottom combined or the right of the cover that will trigger the cover to be loaded for manual confirmation before moving on to the next if "Confirm on threshold" is selected for "Crop method", otherwise it does nothing.- Detected edges :
This is the amount of edges the internal edge detection uses to try and figure out where the exact edge of the front and spine of the cover meet.Increasing this number will increase the chances of the correct poster width being detected but it can also decrease its accuracy by a few pixels if it's too high, which can vary wildly from cover to cover.
The default, 15, was the best middle ground I found with the limited testing I already did but it can probably benefit from being increased most of the time.
3 is the minimum value I would recommend(1 will more often than not detect the left edge of the spine since it goes from left to right) and above 100 is very likely to not be accurate most of the time.
- Aspect Ratio :
When a cover is displayed on the UI, the "DVD" or "BluRay" text will become blue to indicate which aspect ratio from the settings fits best the detected edge.This can also be manually selected to apply the opposite aspect ratio than the one currently selected which will be reflected on the gray lines used for the poster selection.
If no cover is loaded, this does nothing.
- Save poster :
This will save the poster file for the currently loaded cover with the current poster selection when clicked on.It can also be triggered with the Ctrl+s(Hold Ctrl and then press s) keyboard shortcut.
- Refresh cover :
This will re-apply all of the current options and settings to the currently loaded cover and reset it as if it was just loaded.It can also be triggered with the Ctrl+r(Hold Ctrl and then press r) keyboard shortcut.
- Skip poster :
This will move on to the next folder without saving anything for the currently loaded cover.It can also be triggered with the Ctrl+k(Hold Ctrl and then press k) keyboard shortcut.
- Toggle edges :
This will toggle on and off all of the detected edges represented as a vertical pink line over the cover which can help with using the correct amount of detected edges.The pink lines are purely visual and will not be saved on the poster file if left on.
Cover with internally detected edges toggled on and all the panels hidden.
- Save path override :
This will save all of the poster files in this specific folder instead of in the same folder as the cover. Click the ... button to select a path or enter it manually in the text box.- Select root path :
This will decide the location where it begin to search for covers to crop. All the subfolders as well as that root path will be searched.It automatically begins to search once selected so make sure to set all other options and settings first.
It can also be triggered with the Ctrl+p(Hold Ctrl and then press p) keyboard shortcut.
- Exit :
This will close the software, it might take a few seconds to unload everything from memory even after the window disappears(which is common for many apps).- Toggle Settings :
This will toggle on and off the Settings panel at the top of the UI.- Toggle Debug :
This will toggle on and off the Debug panel at the bottom left of the UI.- Toggle Options :
This will toggle on and off the Options panel at the top left of the UI.- Zoom in :
This will increase the current zoom on the cover by the amount set in the "Zoom step" setting.The zoom is applied even if no cover is loaded but nothing will change until a cover is loaded.
It can also be triggered with the Ctrl++(Hold Ctrl and then press +, which might require also holding shift if that is what's required to type a +) keyboard shortcut.
- Zoom out :
This will decrease the current zoom on the cover by the amount set in the "Zoom step" setting.The zoom is applied even if no cover is loaded but nothing will change until a cover is loaded.
It can also be triggered with the Ctrl+-(Hold Ctrl and then press -) keyboard shortcut.
- Reset zoom :
This will reset the current zoom back to the default value of 1x, which is the original size of the cover.It can also be triggered with the Ctrl+z(Hold Ctrl and then press z) keyboard shortcut.
- Save all :
This will save the current values of every UI elements as well as which panel is toggled on and off to a file named "config.ini" in the same folder as the software.- Save settings :
This will save the current values of the settings panel to the "config.ini" file.- Save debug :
This will save the current values of the debug panel to the "config.ini" file.- Save options :
This will save the current values of the options panel to the "config.ini" file.- Save the layout :
This will save the current layout, which panels are toggled on and off, to the "config.ini" file.Initial release: v1 - 2024-05-10
Currently known bugs:
- If the 2 left panels are saved hidden, the left panel holder will not hide itself properly when the software is opened next and it will prevent covers from being displayed properly until either the debug or the options panel is toggled back on(it can also be toggled back off immediately).- The settings panel will sometimes get toggled on under the cover, but the main window can be manually resized to show it. Cause currently unknown.
Downloads:
Windows
Executable v1.1 (65MB): MediaFire v1.1Executable v1 (65MB): MediaFire v1 Mirror: Filejoker v1
Source: See the 1st attachment below
Linux:
Executable: My executable generation failed to compile it properly so it may or may not happen :/Source: See the 2nd attachment below.
Note: The linux specific source required one thing to be removed to work, which means it's important to not click back on the main window when the cover selection window is open or the software could crash. I will hopefully find a way to do this that works properly for both windows and linux in the future.
ImageMagick: https://imagemagick.org/script/download.php
Any version should do but I use the "portable-Q16-x64" one.
You will need to have python 3.11(other versions may work but are untested) installed as well as the following modules:
- opencv-python (which should also install numpy)
- pillow
- piexif
You can run this pip command to install them all:
or on linux you can use your software manager to install them since they are usually included in there and is the preferred method on many distro.
You can then launch it from command line or a terminal with this command or create a shortcut that starts that command:
You can also associate python with .py files directly and double-click the .py file to launch it.
- opencv-python (which should also install numpy)
- pillow
- piexif
You can run this pip command to install them all:
Code:
pip install opencv-python numpy pillow piexifYou can then launch it from command line or a terminal with this command or create a shortcut that starts that command:
Code:
python Cover_cropper.pyAny feedback and especially bug reports are very welcome, either as a reply here or in a private message if you're too shy.
Attachments
Last edited:
")